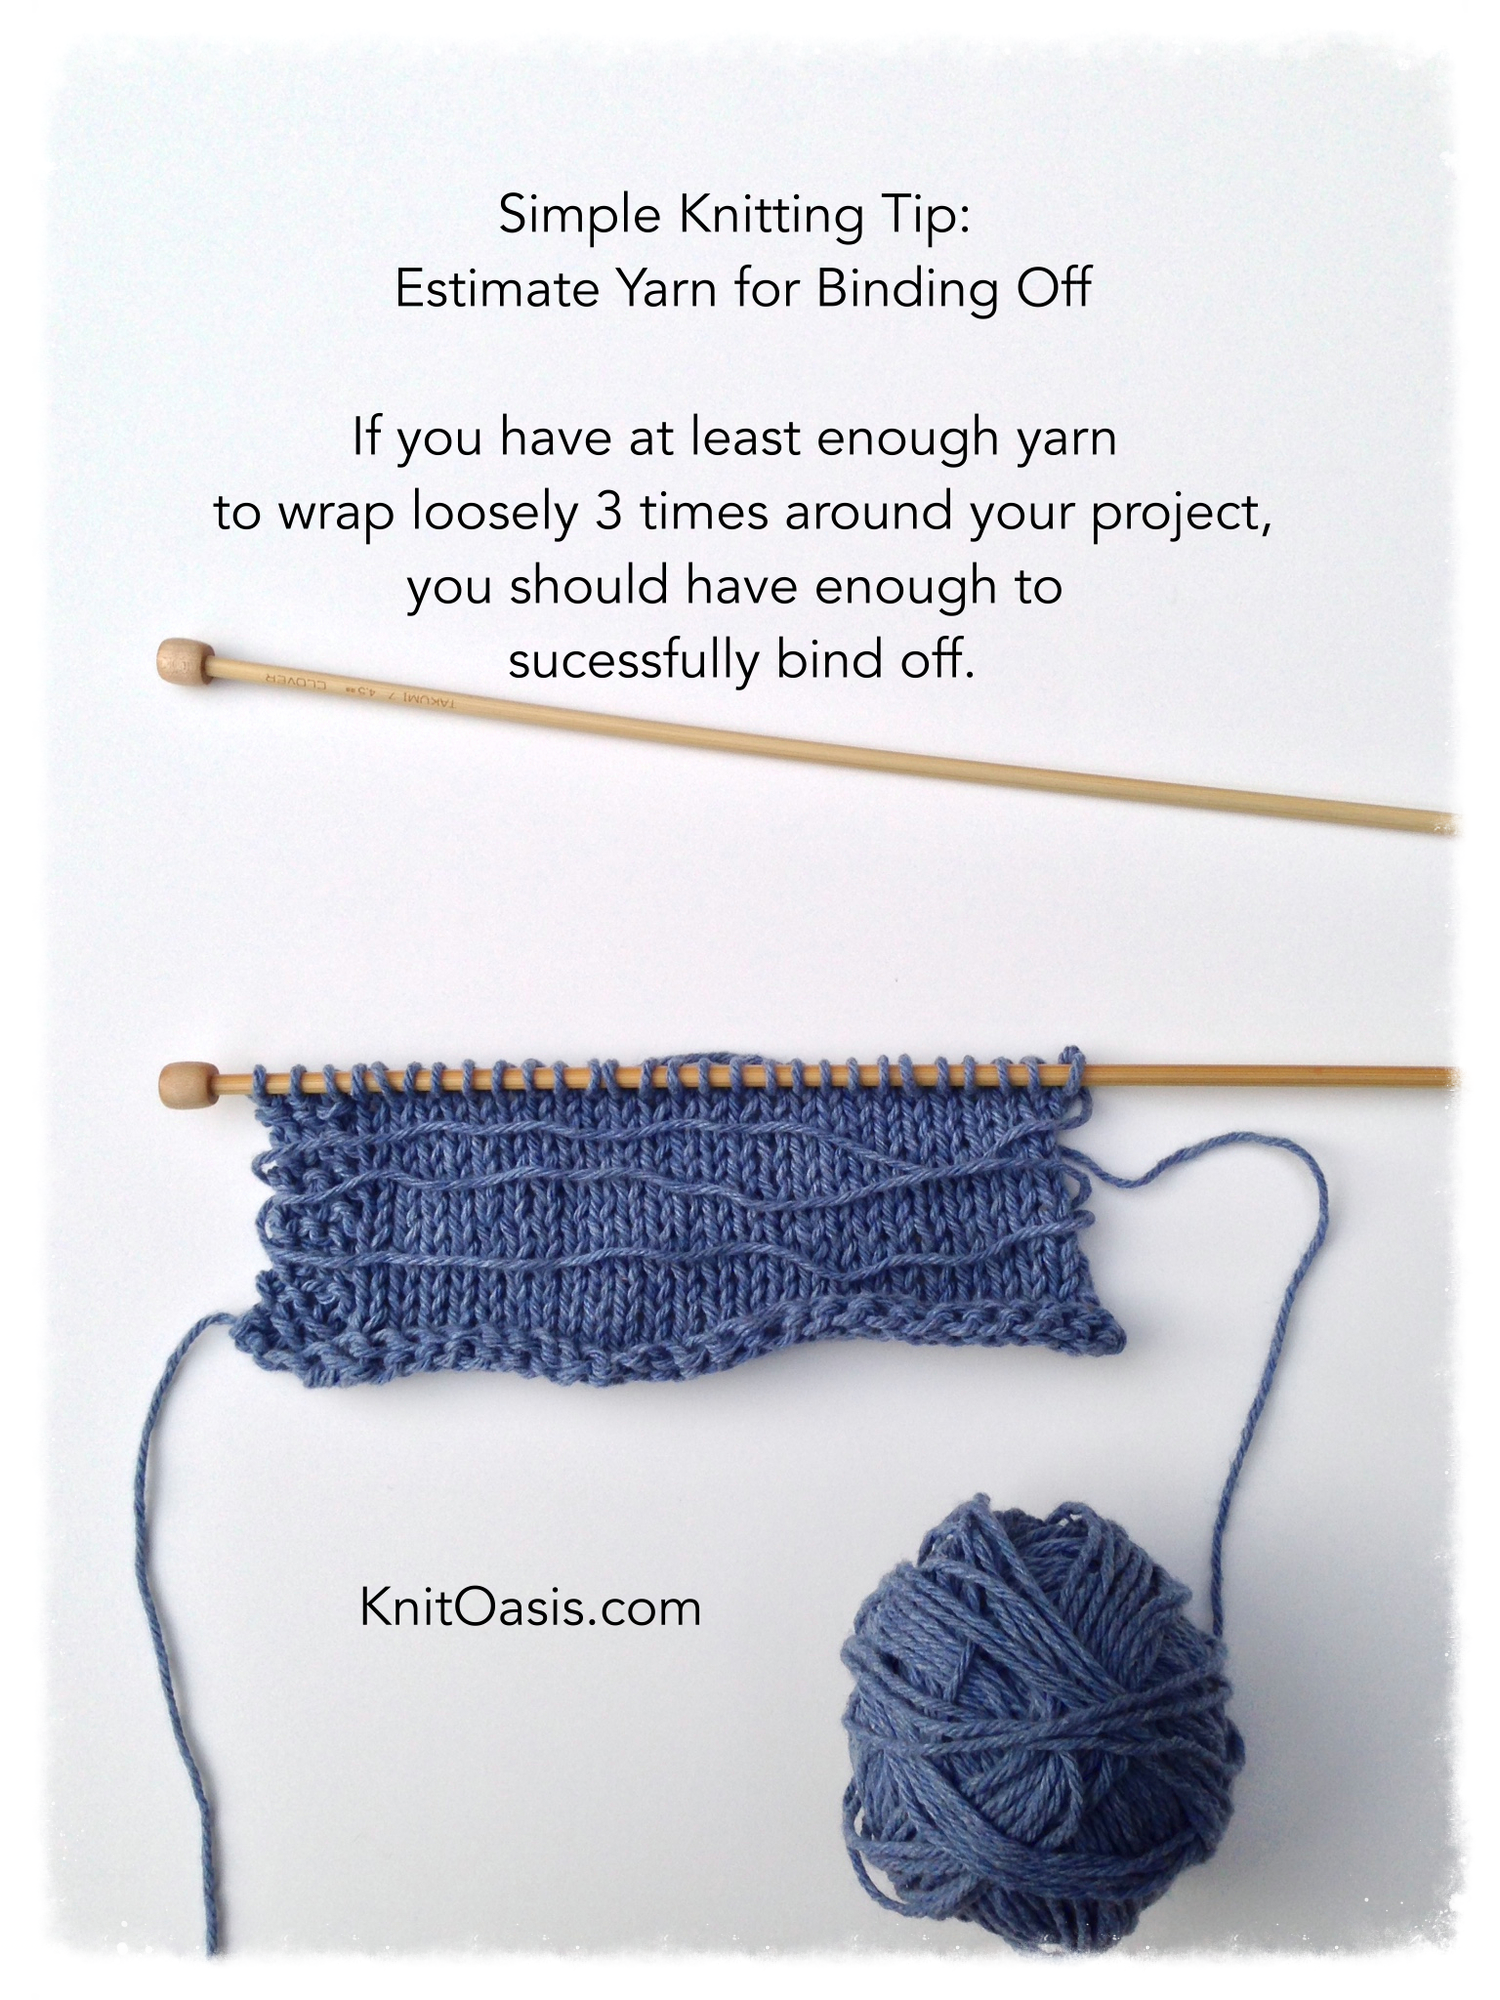
Simple Knitting Tips: Estimate Yarn for Binding Off

In honor of the inaugural session of my new class "Finishin' Strong: Bind-offs and (Some) Seaming, today's Simple Knitting Tip is all about making sure you have enough yarn to bind off.

The first thing to consider if you want to make sure you have enough yarn is this:  buy more yarn than you think you might need. Sometimes this works, sometimes it doesn't. Sometimes you are just knitting a scarf and want to use up ALL the yarn, but if you can, buy extra yarn to save yourself some stress.

BUT. If you are in the situation that requires some careful consideration about the amount of yarn leftover, here's a simple rule of thumb trick for estimating how much yarn you'll need to bind off your project.

Wrap the working yarn l-o-o-s-e-l-y around the project 3 times (wrap 4 times if you're paranoid). The amount of yarn it takes to wrap the width of your project those three times is how much yarn you will need to bind off.

estimateyarn.jpg


Follow my blog with Bloglovin

Simple Knitting Tips: The Side Marker

When I posted this Simple Knitting Tip last week about adding a loop of yarn to your row counter and securing it with a locking stitch marker, I remembered that time I wrote about another fun use for a locking stitch marker, then realized that it was nowhere on this website. It was an awkward moment.

And so I ask you to bear with me if you've read this before, because here again, with a few improvements and maybe for the first time, is this....

Simple Knitting Tip: The Side Marker

When I am knitting a project, and I need to know the right side from the wrong side, and I don't want to expend too much energy re-thinking the answer to that question over and over, I attach a marker (like the one pictured) to the right side of the work. You could attach it to the wrong side if you prefer, and I promise it won't hurt my feelings, but I strongly suggest you pick one side and stick with it. You can also tie a piece of contrasting color yarn, if you don't have a stitch marker handy that opens and closes, or if you're like me and it's just easier to cut a random piece of yarn and tie it on, because there is yarn everywhere around here.

Obviously this isn't something you'll need to use all that often, but if you're wanting to simplify things (like say you're at knitting group and there's wine involved, just a For Instance...), this can be a super quick fix. A great example of a pattern where a side marker comes in handy is my Reversible Cable Shawl, a free pattern available from Red Heart Yarns. Because it is reversible, it's not always easy to know which row you're on or which side you're on, unless you're working overtime to pay attention.  Work smarter, not harder--attach a marker to the right side and cut down on the time needed to find your place, thereby spending more time knitting, and isn't that what it's all about?

I don't recommend branching out to other types of markers, beyond the locking kind or the loop of yarn securely knotted. I have tried the non-locking type and they don't always stay on and, well, chaos. And, depending on how much wine you've had at knit night, using the stitch markers that do not open at all is really just funny for your friends to watch.

Follow my blog with Bloglovin

Simple Knitting Tips: Get a Little Loopy

When I knit, stitch markers and row counters are not optional. They are as necessary to the process as sticks and string. They can come in a wide variety of shapes, sizes, and materials, but they are an integral part of keeping me on task. Maybe you can knit an entire project without interruption, but I am always setting projects down in the middle.

When I first started knitting and wasn't yet sure I wanted to invest any money into it (I know, right? That's hilarious to think about now) I simply used hash marks on a sticky note to keep track of my rows. I just made a mark whenever I started a new row, then I could tell by looking at the paper what row I was working on when the phone rang. This actually works really well unless the length of time it takes to finish the project lasts longer than the sticky on the note.

Nowadays I have a rather large collection of row counters, most of which are currently in use. I turn the number up one when I start a new row, and down one when I am "tinking" an old row.  These row counters work great on straight needles, but circulars and double-points are not very well suited to them, as the row counter tends to leave a gap in the knitting.

They do sell the ones with the plastic ring attached like the one pictured here, but, let's face it, I'm not always gentle when I'm shoving knitting into a bag. When the plastic ring breaks off and the row counter disappears, life gets a little ugly for a spell.

Today's Simple Knitting Tip: Get a Little Loopy. Put a little piece of leftover yarn through the hole on the row counter, tie it into a loop, then use it on your circulars and double-points with confidence. I usually put the little loop on a locking stitch marker, too, then use that anywhere and everywhere that you can use a locking stitch marker.

IMG_0107_2.jpg

How do you keep track of your rows? Do you prefer the plastic row counters like I use, or do you have a favorite "clicker" counter? Have you gotten a little loopy in your attempts at keeping track of your knitting? Anonymous comments are allowed, but this is, after all, a judgement-free zone. A little loopy can be a good thing.


Follow my blog with Bloglovin

The "Indigo To-Go" Bag

I admit it--I am a total bag lady. I have a bag in my closet that is just holding other bags. Actually, I have more than one bag in my closet that is just holding other bags. This may indicate that I have a problem, but I like to think of it as being prepared for any packing situation.

Some bags I use daily, and the little pouch in my purse that carries my lipstick(s), hand cream and emergency eye pencil (which doubles nicely as a pencil for writing on paper when you've changed purses and forgotten to make sure you have a pen, ask me how I know) is one of those. For several years I have used a hand knitted, simple stockinette bag, my most recent one being made of an orphan skein of Regia sock yarn. About a month ago, I looked at that bag and literally thought, "WHY is this not made out of hand-dyed indigo??"

Enter the "Indigo To-Go" Bag.

I designed and knit it and sold it as a kit. All of that is good, but the important thing here is that I LOVE using it! Having a bit of indigo with me all the time makes me happy. Plus, the medallion design makes me think of Art Deco (which makes me happy) and the zipper color I chose is green (which also, you guessed it, makes me happy). People, if we can't knit things that make us happy, why on earth do we bother?

As of this post I do have a limited number of kits (hand-dyed indigo yarn + pattern + zipper + hand-dyed indigo fabric) left in my Etsy shop, ready to ship within mere days of your order. If we sell out, I will make more kits, which will take a couple of weeks to ship out, but will also be fabulous. The pattern, however, is available instantly due to the wonders of modern technology. You can purchase it on Ravelry, Etsy or Craftsy, or if you're local, I'll print you one and put it in a sheet protector at no extra charge (this holds true of the other patterns I have for sale as well--just never thought to mention it before!).

Knitted up, this bag makes a great gift idea, for those of you who are looking for a quick gift to knit for the holidays. You'll need less than 100 yards of worsted weight yarn (I like blue), size 5 needles, a cable needle, a yarn needle, a zipper, a bit of fabric for the lining, and about a day's worth of time. There's also a handy tutorial here about adding the zipper and lining.

The pattern includes instructions for making both the center medallion and the column of cables designs.

Knit something happy today, y'all.

Follow my blog with Bloglovin